

Deploying Greenbone OpenVAS Remote Scanners#
Deploying a standalone vulnerability management system is often straightforward, but scaling it with Remote Sensors is where the real challenge begins. From AppArmor conflicts to tricky TLS handshake failures, official documentation sometimes glosses over the real-world hurdles you’ll face.
This guide provides a complete, production-ready walkthrough that covers:
- A Greenbone Community Master Node
- A Remote OSP Sensor
- A secure Certificate Authority (CA) setup
- OSP over mutual TLS on port 9390
- Docker-based isolated deployments The end result is a robust and reproducible deployment you can rely on.
Architecture Overview#
Before we dive in, let’s get a high-level view of the components we’ll be working with.
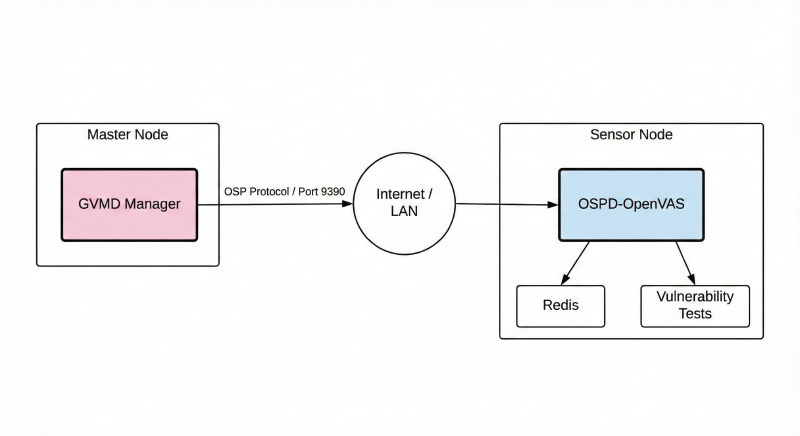
Master Node (Manager)#
The Master Node is the brain of the operation. It runs the core Greenbone services like gvmd (the manager daemon), gsa (the web interface), and the PostgreSQL database. All scan configurations, reports, and credentials are stored here, and it controls the remote sensors using the OSP protocol over a secure TLS channel.
Sensor Node (Scanner)#
The Sensor Node is a lightweight, isolated scanner that performs the actual vulnerability tests. It runs the ospd-openvas scanner daemon and a redis instance. Because it’s isolated, it’s perfect for deploying into segmented networks like a DMZ, an internal VLAN, or a separate cloud environment.
Communication#
All communication between the Master and Sensor happens over the Open Scanner Protocol (OSP) on TCP port 9390. To ensure no one can eavesdrop or impersonate either component, we’ll secure the connection using Mutual TLS (mTLS), where both the client and server must present a valid certificate to authenticate each other.
Step 1: Create Certificate Authority + Certificates (Master Node)#
To establish a trusted mTLS connection, we need a central Certificate Authority (CA). We’ll configure the Master node to act as our own private CA. By signing all certificates with it, we create a closed loop of trust that prevents common handshake failures.
Run on the Master Host:
mkdir -p ~/gvm-certs && cd ~/gvm-certs
1. Generate the Root CA (Trust Anchor)#
openssl genrsa -out ca.key 4096

openssl req -x509 -new -nodes -key ca.key -sha256 -days 3650 -out cacert.pem \
-subj "/C=US/O=HomeLab/OU=Security/CN=Greenbone Root CA"
2. Generate Sensor Certificates (Server) -> Send these to Remote Sensor#
Crucial: We must add the Subject Alternative Name (SAN) or the handshake may fail on modern systems. Replace IP:10.10.X.X with your actual Sensor IP.
openssl genrsa -out serverkey.pem 4096

openssl req -new -key serverkey.pem -out server.csr \
-subj "/C=US/O=HomeLab/OU=Sensor/CN=ospd-openvas"

# Note the -addext flag below to validat the IP
openssl x509 -req -in server.csr -CA cacert.pem -CAkey ca.key -CAcreateserial \
-days 3650 -sha256 -out servercert.pem \
-extfile <(printf "subjectAltName=IP:10.10.X.X,DNS:ospd-openvas.local")
3. Generate Master Certificates (Client) -> Keep these on Master#
openssl genrsa -out clientkey.pem 4096
openssl req -new -key clientkey.pem -out client.csr \
-subj "/C=US/O=HomeLab/OU=Master/CN=gvm-master"
openssl x509 -req -in client.csr -CA cacert.pem -CAkey ca.key -CAcreateserial \
-out clientcert.pem -days 3650 -sha256
4. Set permissions#
# Public certs can be readable by anyone
chmod 644 *.pem

# Private keys should ONLY be readable by the owner
chmod 600 *.key
What does chmod 644 do? This command sets the file permissions. The 644 value ensures that the file’s owner can read and write the files, while other users on the system can only read them. This is a standard security practice to protect sensitive files like certificates and keys from unauthorized modification.
Why chmod 600 for keys? 644 allows other users to read the file. For private keys (.key), this is insecure. 600 ensures only the owner (you) can read/write the key, preventing credential theft.
Step 2: Deploy the Remote Sensor#
- Create directories on the Sensor:
mkdir -p ~/greenbone-sensor/certs
- Transfer Certificates: Copy
cacert.pem,servercert.pem, andserverkey.pemfrom the Master to the Sensor machine.
Place them under:
~/greenbone-sensor/certs/
How to Transfer the Files? A simple method is to use scp (Secure Copy). From your master node, run: scp ./cacert.pem ./servercert.pem ./serverkey.pem user@<SENSOR_IP>:~/greenbone-sensor/certs/.
Alternatively, you can start a temporary web server on the master (python3 -m http.server 8000) and use wget on the sensor to download the files.
- Create
docker-compose.ymlfor Sensor
services:
  # --- FEED SERVICES ---
  vulnerability-tests:
    image: registry.community.greenbone.net/community/vulnerability-tests
    environment:
      FEED_RELEASE: "24.10"
    volumes:
      - vt_data_vol:/mnt

  notus-data:
    image: registry.community.greenbone.net/community/notus-data
    volumes:
      - notus_data_vol:/mnt

  gpg-data:
    image: registry.community.greenbone.net/community/gpg-data
    volumes:
      - gpg_data_vol:/mnt

  # --- INFRASTRUCTURE ---
  redis-server:
    image: registry.community.greenbone.net/community/redis-server
    restart: always
    volumes:
      - redis_socket_vol:/run/redis/

  mqtt-broker:
    image: registry.community.greenbone.net/community/mqtt-broker
    restart: always
    ports:
      - "1883:1883"
    networks:
      default:
        aliases:
          - mqtt-broker
          - broker

  # --- SCANNING ENGINES ---
  openvasd:
    image: registry.community.greenbone.net/community/openvas-scanner:stable
    restart: on-failure
    environment:
      OPENVASD_MODE: service_notus
      GNUPGHOME: /etc/openvas/gnupg
      LISTENING: 0.0.0.0:80
    volumes:
      - openvas_data_vol:/etc/openvas
      - openvas_log_data_vol:/var/log/openvas
      - gpg_data_vol:/etc/openvas/gnupg
      - notus_data_vol:/var/lib/notus
    depends_on:
      - vulnerability-tests
      - gpg-data
    networks:
      default:
        aliases:
          - openvasd

  configure-openvas:
    image: registry.community.greenbone.net/community/openvas-scanner:stable
    volumes:
      - openvas_data_vol:/mnt
      - openvas_log_data_vol:/var/log/openvas
    command:
      - /bin/sh
      - -c
      - |
        printf "table_driven_lsc = yes\nopenvasd_server = http://openvasd:80\n" > /mnt/openvas.conf
        sed "s/127/128/" /etc/openvas/openvas_log.conf | sed 's/gvm/openvas/' > /mnt/openvas_log.conf
        chmod 644 /mnt/openvas.conf
        chmod 644 /mnt/openvas_log.conf
        touch /var/log/openvas/openvas.log
        chmod 666 /var/log/openvas/openvas.log
    depends_on:
      - openvasd

  ospd-openvas:
    image: registry.community.greenbone.net/community/ospd-openvas:stable
    restart: always
    hostname: ospd-openvas.local
    ports:
      - "9390:9390"
    cap_add:
      - NET_ADMIN
      - NET_RAW
    security_opt:
      - seccomp=unconfined
      - apparmor=unconfined
    command:
      [
        "ospd-openvas", "-f",
        "--config", "/etc/gvm/ospd-openvas.conf",
        "--mqtt-broker-address", "mqtt-broker",
        "--notus-feed-dir", "/var/lib/notus/advisories",
        "-m", "666",
        "--listen-address", "0.0.0.0",
        "--port", "9390",
        "--ca-file", "/var/lib/gvm/CA/cacert.pem",
        "--cert-file", "/var/lib/gvm/CA/servercert.pem",
        "--key-file", "/var/lib/gvm/private/CA/serverkey.pem"
      ]
    volumes:
      - gvm_data_vol:/var/lib/gvm
      - gpg_data_vol:/etc/openvas/gnupg
      - vt_data_vol:/var/lib/openvas/plugins
      - notus_data_vol:/var/lib/notus
      - ospd_openvas_socket_vol:/run/ospd
      - redis_socket_vol:/run/redis/
      - openvas_data_vol:/etc/openvas/
      - openvas_log_data_vol:/var/log/openvas
      # MOUNT YOUR CERTIFICATES
      - ./certs/cacert.pem:/var/lib/gvm/CA/cacert.pem
      - ./certs/servercert.pem:/var/lib/gvm/CA/servercert.pem
      - ./certs/serverkey.pem:/var/lib/gvm/private/CA/serverkey.pem
    depends_on:
      - redis-server
      - mqtt-broker
      - openvasd

volumes:
  gvm_data_vol:
  gpg_data_vol:
  vt_data_vol:
  notus_data_vol:
  ospd_openvas_socket_vol:
  redis_socket_vol:
  openvas_data_vol:
  openvas_log_data_vol:
- Start the Sensor:
docker compose up -d
Step 3: Configuring the Master Node#
On the Master, we use the standard community compose file, but we need to register the scanner using the Client Certificates we generated in Step 1.
- Copy Certificates into Container: Move the certificates from the Host into the gvmd container so it can access them.
docker compose cp cacert.pem gvmd:/tmp/ca.pem
docker compose cp clientcert.pem gvmd:/tmp/cert.pem
docker compose cp clientkey.pem gvmd:/tmp/key.pem
- Fix Permissions (Crucial):The gvmd user inside the container (UID 1001) cannot read files owned by root. We must change ownership.
docker compose exec -u root gvmd chown gvmd:gvmd /tmp/ca.pem /tmp/cert.pem /tmp/key.pem
- Register the Scanner: Run this single-line command to add the remote sensor. Replace 10.10.X.X with your Sensor IP.
docker compose exec -u gvmd gvmd gvmd --create-scanner="Remote Sensor 1" \
--scanner-type="OSP-Sensor" \
--scanner-host=10.10.X.X \
--scanner-port=9390 \
--scanner-ca-pub=/tmp/ca.pem \
--scanner-key-pub=/tmp/cert.pem \
--scanner-key-priv=/tmp/key.pem
- Cleanup: Remove the temporary keys from the container for security.
docker compose exec -u root gvmd rm /tmp/ca.pem /tmp/cert.pem /tmp/key.pem
Step 4: Verification#
- Check via CLI:
docker compose exec -u gvmd gvmd gvmd --get-scanners
You should see “Remote Sensor 1” listed.
- Check via Web UI:
- Navigate to Configuration > Scanners.
- Find “Remote Sensor 1”.
- Click the
Verifyicon. - Success: It should return the OSP Protocol version (e.g., OSP Server 22.6.2).
- First Scan: Create a new Task and select “Remote Sensor 1” from the Scanner dropdown.
Troubleshooting Common Issues#
- Cause: The Master node is currently downloading the Feed data (SCAP, CERT, Scan Configs).
- Solution: This takes 30-60 minutes on a fresh install. Check progress with docker compose logs -f gvmd. Wait for Syncing scan configs… done.
- Cause: Firewall or Certificate mismatch.
- Fix:
- Ensure Port 9390 is open on the Sensor (netstat -tulpn | grep 9390).
- Ensure the Sensor container has the correct keys mounted.
- Check Master logs: docker compose logs gvmd for TLS handshake errors.
docker compose logs -f gvmd) and the Sensor (docker compose logs -f ospd-openvas). Error messages are often logged on one side but not the other, and they provide the best clues for solving connection issues.